
Mastering pothos plant care low light conditions is the “secret sauce” for indoor gardeners looking to turn a single vine into a lush, green sanctuary. While most houseplants demand bright, indirect sun, the Pothos (Epipremnum aureum) is famous for its resilience. Understanding epipremnum aureum low light care allows you to navigate the delicate balance between survival and growth. In dim environments, the plant’s metabolism slows down, meaning its physiological needs—from photosynthesis to cellular respiration—change significantly.
Whether you are dealing with pothos light requirements indirect or trying to keep variegated pothos in low light, success starts with recognizing that “low light” does not mean “no light.” According to the Royal Horticultural Society, even shade-tolerant plants require enough light to produce chlorophyll. Without it, your plant will eventually lose its vigor.
Identifying the Best Plants to Propagate for Dim Spaces
Before you take your first cutting, you must select the right variety. Not all pothos are created equal when it comes to devil’s ivy shade tolerance.
Top Varieties for Darker Corners
- Jade Pothos: This is the undisputed champion for best pothos for office with no windows. Its solid green leaves are packed with chlorophyll, allowing it to maximize limited light.
- Golden Pothos: A classic choice for best pothos for dark bedrooms, though it may lose some yellow marbling in favor of solid green to survive.
- Neon Pothos: Surprisingly effective for best pothos for low light kitchens, adding a pop of color where most plants would fade.
Apartment Example: If you live in a basement unit with only high, narrow windows, the Jade Pothos is your best bet for best pothos for basement apartments. Its high chlorophyll density ensures it stays healthy despite the lack of direct sun.
Essential Tools and Supplies for Successful Propagation
Propagation is essentially a minor surgery for your plant. Having the right tools ensures the parent plant recovers quickly and the new cutting develops a strong root system.
The Propagation Kit
- Precision Shears or Sharp Scissors: Clean cuts prevent tissue crushing.
- Glass Jars or Vials: Transparent containers allow you to monitor root development.
- Filtered or Dechlorinated Water: High chlorine levels can inhibit pothos root rot prevention shade efforts.
- Sterilizing Agent: Use 70% isopropyl alcohol to wipe your blades between cuts.
Horticulture Tip: Professional growers emphasize the “node.” The node is the small, brownish bump on the stem where leaves and aerial roots emerge. Without a node, a cutting cannot produce new roots.
Water Propagation Methods for Beginners
Water propagation is the most visual and rewarding way to expand your collection. It is particularly effective for low light trailing plants because it removes the guesswork of soil moisture.
Step-by-Step Water Rooting
- Identify the Node: Locate a healthy vine and find the nodes along the stem.
- The Optimal Cutting Angle: Using your sterilized shears, cut the vine at a 45-degree angle about half an inch below a node. This increased surface area encourages better water uptake.
- Leaf Management: Remove the bottom leaves so that no foliage is submerged in water, which prevents bacterial rot.
- Placement: Place the cutting in a glass of room-temperature water.
For pothos watering needs low light, remember that water in the jar won’t evaporate as fast as it would in a sunny window. Change the water every 5–7 days to replenish oxygen levels.
Apartment Example: A student in a dorm can easily set up a “propagation station” on a desk. This is the best pothos for low light dorm rooms because it requires minimal space and no messy soil during the initial phase.
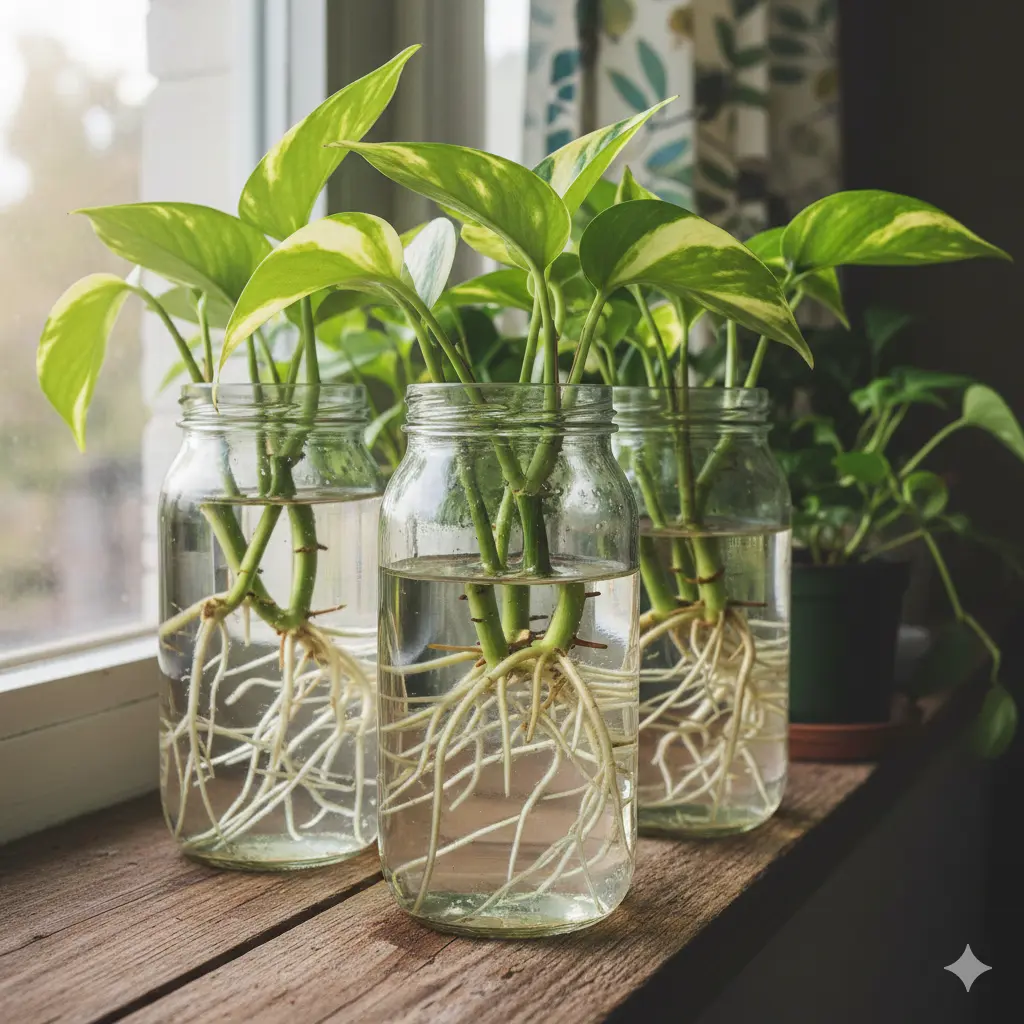
[Image: Three glass jars containing pothos cuttings with visible white roots growing from the nodes. Alt text: Pothos stem cuttings in water-filled glass jars showing successful root development from the nodes.]
Soil Propagation Techniques for Stronger Roots
While water propagation is easier to see, soil propagation often leads to a more robust root system that is already acclimated to a terrestrial environment. This is ideal for best pothos for dimly lit hallways where you want a “set it and forget it” approach.
The Direct-to-Soil Method
- Prepare the Medium: Use a well-draining potting mix. Adding perlite or orchid bark can help with pothos root rot prevention shade.
- Dipping (Optional): While pothos root easily, a dip in organic rooting hormone can speed up the process.
- The “Finger” Test: Insert the cutting into the soil, ensuring at least one node is buried. Firm the soil around it to remove air pockets.
- Humidity Control: In low light, the air can feel stagnant. Placing a clear plastic bag over the pot can create a mini-greenhouse, maintaining the humidity requirements for new propagations.
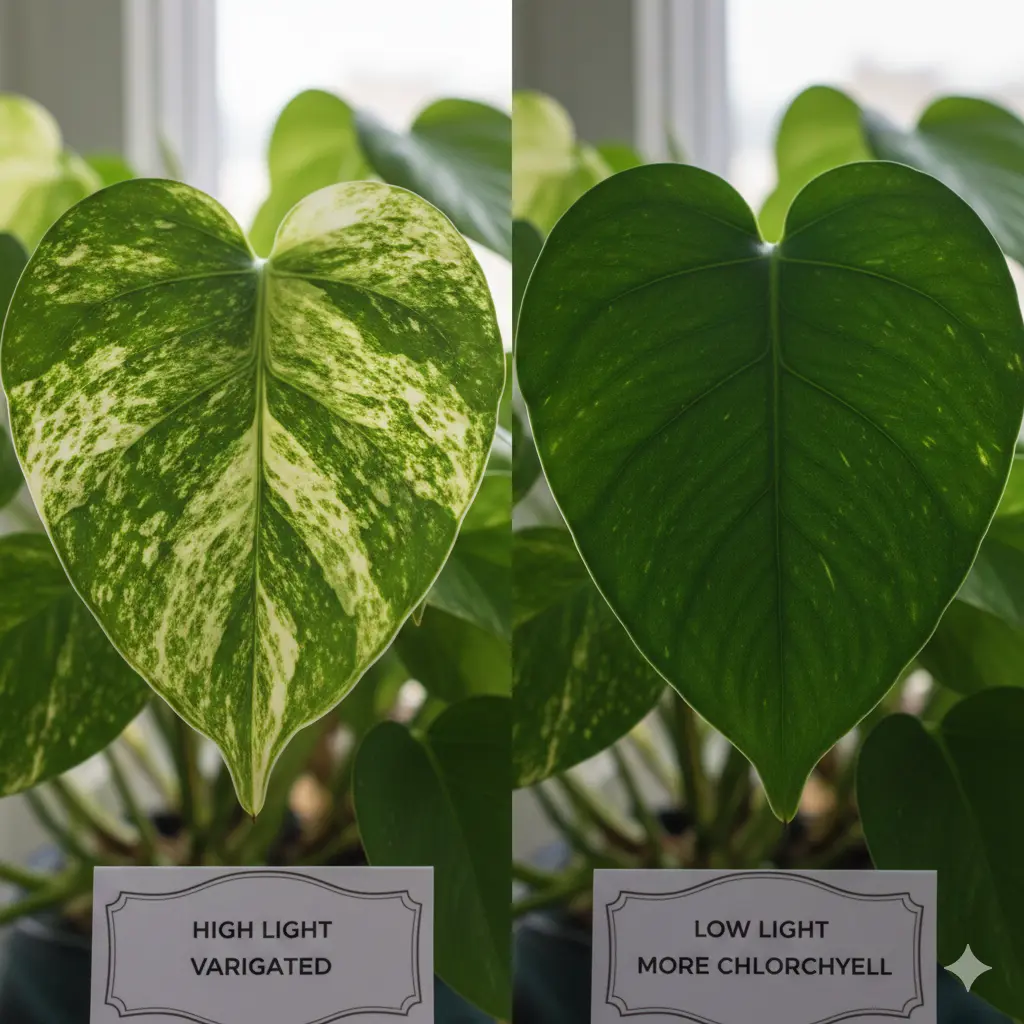
Pothos Leaf Color and Health in Dim Light
One of the most common questions involves pothos leaf color in dim light. When light levels drop, variegated plants (like the Marble Queen) often “revert.” This means they produce more green to capture what little light is available.
Managing Color and Growth
If you notice your variegated pothos in low light is turning completely green, it’s not sick; it’s adapting. To maintain variegation in best pothos for windowless spaces, you may need to supplement with a small LED grow light for a few hours a day.
Cause and Effect:
- Cause: Low light levels.
- Effect: Increased chlorophyll production, leading to darker, greener leaves and longer gaps between nodes (leggy growth).
Apartment Example: If you have a best pothos for north facing balconies, the light is consistent but weak. Expect the leaves to be smaller than those grown in bright southern light, but the plant will remain a healthy, deep green.
Common Mistakes and Troubleshooting
Even the most experienced indoor gardeners face challenges. When dealing with pothos plant care low light conditions, the margins for error are slimmer.
Issues to Watch For
- Yellowing Leaves: This is often a sign of overwatering. In shade, the plant uses less water. Ensure the top two inches of soil are dry before watering.
- Brown Tips: This usually indicates low humidity or a buildup of salts from tap water. Consider using distilled water.
- Root Rot: This is the biggest killer in dim spaces. Pothos root rot prevention shade relies on using pots with drainage holes and avoiding “wet feet.”
- Stagnant Growth: If your plant stops growing in a best pothos for dark bedrooms, it may just be in a dormant phase. Avoid over-fertilizing during this time.
Aftercare for New Propagations
Once your cuttings have roots at least two inches long, it’s time for long-term care. Transitioning from water to soil can be stressful for the plant.
The Transition Phase
- Keep Soil Moist: For the first two weeks after transplanting from water to soil, keep the medium slightly more moist than usual to help the “water roots” adapt.
- Avoid Immediate Repotting: Wait until the plant is established before considering pothos repotting low light conditions. Pothos actually prefer being slightly root-bound.
- Air Quality Benefit: Enjoy the pothos air purification in shade. Studies, including those from NASA, suggest pothos can help filter indoor toxins like formaldehyde, making them the best pothos for low light bathrooms.
Key Takeaways for Pothos Success
- Node is King: You cannot propagate without a node; ensure every cutting has at least one.
- Light Matters: Even for low light trailing plants, some ambient light is necessary for long-term health.
- Water Sparingly: In dim areas, wait for the soil to dry out significantly to prevent rot.
- Be Patient: Cuttings grow slower in low light; give them 4–6 weeks to show significant rooting.
- Clean Tools: Always sterilize equipment to prevent the spread of pathogens.
- Match Variety to Room: Use Jade Pothos for the darkest spots and Golden or Neon for slightly brighter “low light” areas like best pothos for low light kitchens.
Thank You For Visiting Our Website https://celltostem.site/. We Value Your Feeback!